
Installation & Care
The installation and maintenance procedure for Ipe decking, in the order the work is done. These are the working practices published alongside the lumber; they sit beneath the local building requirements that govern the finished deck.
Ipe is a distinctive decking product with installation methods that are not used for composites and softwoods. The stages below run from the delivery stack to the finished, sealed surface.
- 01
Job site storage
Ipe decking can be stacked outdoors, but it is kept at least 4 inches clear of solid surfaces and covered so that it does not fade before it is laid.
Air dried decking is allowed to acclimatise before installation to limit shrinking afterwards. It will ultimately lose moisture, but it will not gain moisture and expand. The acclimatisation period depends on the moisture content of the wood and on the climate, but two to three weeks is the working rule; laying the boards across framing members gives the best result. Kiln dried tongue and groove porch flooring and pre-grooved decking do not require acclimatisation.
- 02
Safety
As with any construction work, protective equipment and clothing are worn. Ipe is heavier and more dense than most other woods, so quantities that would be lifted comfortably in softwood are not lifted in Ipe.
Most domestic and imported hardwood dust is treated as carcinogenic and can cause breathing problems, so dust masks are worn when cutting or sanding hardwoods.
- 03
Tools
Carbide tipped saw blades with fewer teeth, 16 teeth on a 7-1/4 inch blade, stay cooler, reduce friction and stay sharper for longer. For a mitre saw, 10 or 12 inch blades are used, with roughly 24 teeth on a 10 inch blade and 32 teeth on a 12 inch blade.
Drilling is a struggle with the wrong bit. High speed steel fatigues quickly, which causes breakage and dulling. Titanium nitride coated bits perform well until the coating wears. Cobalt alloy bits are the most effective and the longest lasting in Ipe. The bit is lifted out of the hole periodically to clear the shavings.
Board benders are effective at straightening crooked boards. These tools are typically self locking, which speeds up work because a second person is not needed to hold the board while it is fastened.
- 04
End sealing
End sealing with a paraffin wax based product is the step that limits end checking. Checking, the tiny cracks that open as moisture leaves, occurs in every species. Most hardwood decking mills wax the lumber ends before shipping.
Fresh cut ends are waxed immediately after cutting. A small folded rag lightly dipped in the wax and dabbed on the cut end works best. Wax is kept off the face of the board because it stains; excess on the surface is scraped off with a putty knife and lightly sanded in that area only. When boards are ripped, only the cross cut ends need wax, not the straight grain. Oil based ultraviolet inhibitors do not hold moisture in at the ends.
- 05
Face screw fastening
Stainless fasteners are used throughout. The high tannic acid content of Ipe produces a dark brown to black reaction stain against zinc coated fasteners such as galvanised screws. Coatings on non-stainless fasteners can separate from the carbon steel body when driven into a material this dense, which leaves bare carbon steel in contact with the wood and stains it as well. Ipe outlasts most decking products, so the fastener is chosen to match that service life.
Face screwing is the most economical and efficient way to lay Ipe. Pre-drilling is necessary to avoid splitting and screw breakage. A trim head screw goes in easily and is inconspicuous because of its 3/16 inch head. Larger heads require a countersink that drills the pilot hole and counter-bores for the head in one pass.
- 06
Under-mount brackets and nailing
Under-mount bracket systems that are screwed from below are not recommended. They do not anchor the board to the joist: an L shaped bracket is fastened to the joist and the board is held under the horizontal leg, so any movement or shrinkage in a wet pressure treated joist or in the board itself can cause failure. The system works better with well seasoned framing.
Hand nailing into Ipe is effectively impossible, and pneumatic nail guns are not recommended, because the wood splits either on impact or later as it loses moisture. Gluing boards to joists with marine grade adhesive and shooting finish nails, a method that circulates on message boards, is not recommended and fails.
- 07
Clip and biscuit fastening
Concealed clip systems, made of plastic, plastic composite or metal, hide the fastener between the boards without breaching the surface.
Plastic and plastic composite clips secure decking well initially, but there is no long term testing behind them, and they remain exposed to ultraviolet light when the sun is directly overhead. Whatever stabilisers are used, ultraviolet exposure of thin plastic can lead to brittleness and cracking, and most manufacturer warranties cover replacement clips rather than the labour to take a deck apart and relay it.
Most aluminium clips ship with stainless screws, which sets up a galvanic pair in which the aluminium becomes the sacrificial metal. Where two different metals are regularly connected by moisture, each develops a corrosion potential; the more noble metal becomes the cathode and the more active metal the anode, and the corrosion rate of the anode rises. Black oxide coating offers only minimal corrosion resistance and is the same coating used on interior drywall screws.
- 08
Plugs
Plugging conceals the screw head by countersinking deeply enough to take a wooden dowel or tapered plug, usually of the same species. It takes a great deal of labour, and it often ends with the plugs more conspicuous than exposed screw heads would have been, because a species with this much colour variation rarely yields plugs that match the colour and grain of the board being fastened. Epoxy putty tinted to a dark oiled hardwood is the alternative used over a small trim head.
- 09
Gapping
Air dried, non kiln dried Ipe requires a minimal gap of one sixteenth of an inch side to side and no gap end to end at butt joints. Shrinkage follows the moisture content of the wood, the climate and ultraviolet exposure.
Kiln dried products, tongue and groove porch flooring and pre-grooved decking, require no added gap: the groove and the clip set the spacing at roughly one eighth of an inch on their own.
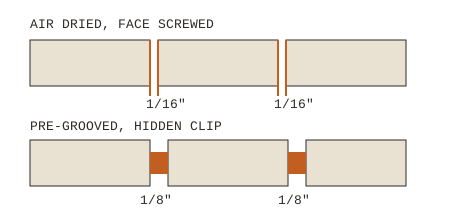
Side to side spacing for air dried face screwed boards and for pre-grooved boards on hidden clips. - 10
Sanding
The surface is not sanded if an oil based ultraviolet inhibitor is going to be applied. Sanding permanently removes the nap from the surface, and without the nap the oil has nothing to penetrate. Sanding is irreversible. A water based film forming inhibitor is unaffected, because its adhesion does not depend on the nap.
- 11
Solid surface installations over sleepers
Like every species, Ipe needs ventilation and drainage beneath it or it will cup and move. It is never fastened directly to a solid surface such as concrete, existing decking, or a rubberised membrane over plywood. A sleeper frame acts as the buffer: sleepers are generally 2x4 or larger pressure treated stock, set on edge so that air moves and water drains. The solid surface beneath is laid to a fall, because standing water under an Ipe deck will cup it. Wider side to side gaps are used to increase ventilation in this build-up.
- 12
Cleaning
A non-harsh cleaner and restorer renews Ipe and other hardwoods such as teak. A light scrub with a medium to stiff bristle deck brush lifts ground-in dirt. Pressure washing strips old sealer residue well, and a high pressure will not harm or burr the resilient surface of the material, although it is not the first approach on new wood.
- 13
Oiling and sealing
Oiling, often called sealing, is not required. Like every species, Ipe weathers to a silver-grey patina with prolonged ultraviolet exposure, and an inhibitor made for hardwood decks only slows the change.
Oil based inhibitors look best immediately after application and then break down quickly under ultraviolet light; preparation and application both matter, pre-sanding shortens their life, a heavy coat stays sticky and shows footprints, and re-application means stripping the old residue first. Water-borne hardwood finishes accept multiple coats, and two are used for longer service; re-application is a wash with a mild deck cleaner.
- 14
Sealing sequence
Step one: apply only when temperatures stay above 50 degrees Fahrenheit, and do not assume new wood is clean even if it has been rained on. Cleaners sold on the strength of bleach can lighten the colour prematurely; bleach is there to kill mould and mildew, which matters more at the next sealing than at the first.
Step two: wet the deck, then scrub lightly along the grain with a stiff bristle brush and the cleaner. Pressure washing is not as effective on a new deck and can stripe the surface. Rinse and let the wood dry for at least two hours, and longer under cover.
Step three: mix the finish thoroughly before applying it. The first coat is brushed in for adhesion, with a 4 inch brush; later coats can go on with a pad applicator or roller and can follow immediately. Work two or three boards at a time along the full length to avoid overlap marks, and stir every twenty minutes so the finish does not settle. Over a previous oil based application, the old residue is removed first.
Liability note
Each product is tested by the user, owner or installer against its own application, and every federal, state and local building code and regulation applies to the finished work.